


AXING Application Note
Feed in Your Own Videos as a TV Channel via the AXING UIM
In hotels, retirement homes, and hospitals, the TVs in guest rooms typically offer a fixed programme lineup. A dedicated information channel can enhance this offering with in-house content. This allows guests and patients to be reached directly via the television with welcome and corporate videos, information about services, or, in healthcare environments, details about telemedicine services and ward procedures.
Such a channel can be managed centrally and operates independently of your internet connection or external reception devices directly through the internal TV network.
A wide range of content sources can be used:
- professionally produced corporate videos
- screen recordings of existing signage players, slideshows, or presentations
- recordings of lectures and explanatory videos
- …
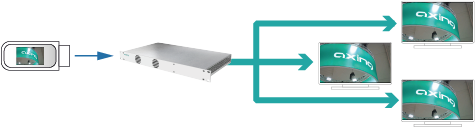
This application note explains how to prepare any video for playback on a TV network and inject it into your DVB-C/T or multicast network as a dedicated information channel using the AXING UIM.
Convert the Video for TV Playback
Videos from videographers, screen recordings, or other sources are usually provided in .mp4 format. This format is not optimized for direct playback as a DVB-C channel within a TV network. The AXING Video Converter transcodes any video into a suitable MPEG transport stream (.ts) with a constant bitrate.
- Open the AXING Video Converter.
- Upload the desired video file using drag & drop.
- Review our standard parameters (service name, codec, resolution, frame rate, bitrate, etc.) and adjust them if required.
- Start the conversion.
- Download the file once the conversion has been completed.
Copy the Video to a USB Stick
The UIM plays videos directly from a connected USB stick. The USB stick must be formatted using the FAT32 file system.
- Connect the USB stick to your computer.
- Format the USB stick as FAT32.
(Right-click the drive > Format > File system: FAT32). - Copy the converted .ts file to the USB stick.
- Then connect the USB stick to the appropriate USB port on the UIM.
Inject the Video as an Information Channel via the UIM
Configuration is performed through the UIM web interface (locally or remotely via SMARTPortal).
- Open the UIM web interface.
- Go to INITIALIZATION > Phase 1.
- Set the type to “File / Folder”.
- Select the desired file or folder.
Note:
If you select a single video file, it will be repeated continuously (looped).
If you select an entire folder, all videos contained within it will be played sequentially in alphabetical order, after which playback will restart from the beginning (looped). - Click “Use Selection”.
- Go to INITIALIZATION > Phase 2.
- Assign a service name.
- Click “Save Changes”.
On the UIM Front Page, you can view the status of the configured inputs (“Playing”) as well as the current utilization of the RF output.
Bonus: Upload Videos Remotely via SMARTPortal
When connected to SMARTPortal, video files can also be uploaded remotely directly to the USB stick connected to the corresponding UIM, without requiring anyone on site to manually reconnect the stick (MAINTENANCE > USB > Upload files). This is particularly useful for updating content at a later date.
- Go to: MAINTENANCE > USB > Upload files.
- Select a folder.
- Click “Upload”.
- Select a file.
Once the upload has been completed, you can inject the file as described above.
Note:
Due to the file size, cloud transfer, and the process of writing the data to the USB stick, remote uploads are noticeably slower than local copying and may take some time. For larger files or multiple UIM devices, local copying is therefore still recommended.